Table Of Contents

Latest update [menu]
1.7 Android P
1.6 Android Oreo
1.5 Autofocus
1.4 Screens supported
Description [menu]
Use red-cyan glasses.
Keep your device always horizontal.
To take the second picture the camera should move to the right about 70 mm (1).
This displacement must be done parallel to the ground and without changing the camera tilt.
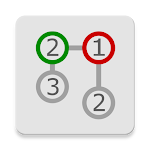
There are three types of help for the first photo and the displacement for the second one:
1: The horizontal line must be green (roll).
2: The vertical line must be green (pitch).
3: On the screen overlays the first picture to serve as a reference.
(1) When using the front camera, the displacement should be to the left.
How to install AndrCam3D APK for Android [menu]
Download AndrCam3D APK file (com.leorod.andrcam3d_7_547348.apk) from SameAPK.com, then follow these steps:
Update Phone Settings
- Go to your phone Settings page
- Tap Security or Applications (varies with device)
- Check the Unknown Sources box
- Confirm with OK
Go to Downloads
- Open Downloads on your device by going to My Files or Files
- Tap the APK file you downloaded (com.leorod.andrcam3d_7_547348.apk)
- Tap Install when prompted, the APK file you downloaded will be installed on your device.
How to install AndrCam3D APK on Windows 7/8/10 or MAC PC? [menu]
Download AndrCam3D APK file(com.leorod.andrcam3d_7_547348.apk) from SameAPK.com to your PC (ex: /Users/xxx/Downloads/(com.leorod.andrcam3d_7_547348.apk)), then follow these steps:
Using Emulator:
- Download And Install one Emulator Softwares (Ex: Bluestacks, GenyMotion, NoxPlayer)
- Simple install APK on PC by drag and drop file com.leorod.andrcam3d_7_547348.apk on Emulator screen
AndrCam3D APK Pros & Cons [menu]
Pros
- This app is safe, it's not require high risk permissions
- Compatible with 32 bit device (most Emulator using 32bit arch CPU)
- Compatible with 64-bit device (some android device and current Bluestacks)
Cons
Everything is good.